Saturday, October 22, 2011

t-shirt scarves...revisited and restyled

late this spring i became obsessed with the t-shirt scarf. after seeing a pin on pinterest i raided andy's t-shirts for anything too big or too old or too unworn. with my metal ruler and rotary cutter, i whipped out four scarves in under an hour and was feeling quite good about my new undertaking. who doesn't love a scarf?

the next week i went to the thrift store and scanned the racks for half-off tags, quickly flipping past shirts with screenprinting or applique. the week after that i went digging...literally...at the goodwill outlet store otherwise known as "the bins". at the bins, they weigh your cart and you pay for your goods by the pound. it's time consuming, but if i ever have a chance to go without children it is so much fun. (i realize that statement makes me a bit sick and strange, but i'm okay with that.)

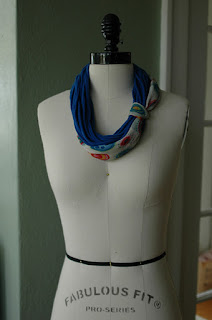
today, i was cleaning my sewing room...a project that has been taking me weeks to finish. there was a pile a shirts waiting to be scarved. while working through them, i started having visions of restyling them and wearing them in different ways. here are a few options you can probably do with things you already have:

mix with assorted necklaces of the same color...or different colors.

take three strands of your scarf, cut them open and braid. fold your scarf in half and loop your braid through. sew ends of braid together and wrap the sewn part with a small piece of leftover t-shirt.

take two long strands of seed beads and loop them around five t-shirt strands. let the beads fall open with the scarf. loop the longest bead necklace, if you like.


loop your t-shirt scarf in half and knot a scarf on the side. tie the ends together.

use a long necklace to loop your t-shirt scarf in half. your necklace must have a clasp to open. you could do the same thing with a piece of ribbon or lace. twist the scarf four or five times before looping the necklace.


use a bracelet to fasten together your t-shirt scarf after you have doubled it. this bracelet wrapped around twice. bracelet must be able to open. turn clasp to back.


have fun...let me know what else you do with your scarves!

lice creeps me out

i totally ended with a preposition, but they do. lice creep me out!

this year we did not have a hot enough summer to kill the little buggers, so there have been many reported cases of lice this fall. freak out. FREAK. OUT. seriously.

there are a lot of things with which i can deal: sickness, fungus, yeast, itches, etc, etc. lice...i am not prepared to deal with lice. i have no desire to deal with lice. it's not just the bugs. they are disgusting, but it's not just ridding them from the scalp that drives me to this paranoia. it's the debugging of the entire house...the entire, huge, overwhelming house. bags and bags and bags of potential eggs on stuffed animals or in clothing, suffocating for two weeks. it's the unending laundry. it is a pain and inconvenience i wish with all my might to avoid.

my paranoia sent me searching for lice repellent formulas...they have to not like something and i was praying it was an essential oil i contained in my collection. a few clicks later, i was reading through a list of things that deter or kill lice. in less than five minutes i had whipped up my first batch of lice repellent spray, thoroughly saturated my children, pulled up the girls' hair, and went to school (where some cases had been reported) to brave whatever lice remained.

over the course of our two hours at classes that morning, i used my spray on all the carpets and chairs in the main gathering places and anywhere i knew the students who had had lice had been. that evening i sprayed the couches at the dance studio. every day for the next two weeks i sprayed everyone before we left the house. i am no longer paranoid...i am prepared.


erin's lice repellent spray

20 oz distilled water
40 drops each: lavendar, tea tree, peppermint, eucalyptus, and rosemary essential oils

shake well before spraying.

note: i did not have rosemary when i made the first batch of this and figured four out of five was better than none. as far as my reading/research said, tea tree and eucalyptus essential oils were the most important, though i had another mom tell me that rosemary was in fact the most necessary ingredient.

off to the races...cyclocross 2011

since moving to portland, each fall andy has raced cyclocross. last year he was granted a signal team paint job on the modified "meschke" bike he rode his first year. this was special because #1: he was getting to be OFFICIALLY on the signal team, and #2: the meschke bike was the first bike nate built...and was the first bike andy raced.

this year is his fourth year of racing, so it's all pretty familiar. andy's trying to place under 30, but would ultimately love to be finishing in the top 20. perhaps if he worked in a bike shop and had endless time to ride his bike. by the end of the year he will qualify for the "master's category"...for all the old guys 35 and up. ;) i'm sure he will stick with his singlespeed category, shunning his age and going for glory on one gear.

here are some of the best of this season's races so far...

alpenrose dairy


 rainier highschool


the hill that makes your eyes pop out

portland international raceway

fun with uncle nate while waiting for andy's race to start


one of these days it will be pouring on sundays again, but for now we are enjoying a few dry races. i'm hoping for at least one more...we will see what tomorrow holds. ;)

eggs!

our chickens started laying eggs about three weeks ago. i was laying in bed, about to get up, when i heard a racket in the coop. i was suspicious, so i before we left for our sign language class i sent mary out to check on the chickens. she came back in, proudly holding our first egg! we were late to class because the excitement forced me to take pictures and unearth the anthropologie egg holder i had purchased this summer.


normally, i use anthropologie for inspiration. i love their beautiful photographs and over-the-top styling, but let's face it...i'm not made of money and do not generally buy things there. this, however, was different. this little splurge was quite a necessity. ;)

since then, we have determined that at least two, and probably a third, is now laying. a baker's dozen currently sits on my counter, waiting to become something. normally the eggs get eaten as quickly as they come in from the coop, but jeremiah temporarily stopped making an "egg in a toast hole" every morning so we could reach the dozen mark.

now, if my two road island reds would stop bullying the other four wyandottes, maybe they will all be laying by thanksgiving!

fruit and nut bars

six months or more ago there was a very small recipe in kirby and jeremiah's "family fun" magazine for a fruit and nut bar. we tried it, liked it, and since then have made several variations. the basic recipe is one part nuts, one part dates, and one part dried fruit. a food processor is a must.

start with the nuts. sometimes i use all raw almonds, sometimes i use 1/2 almonds and 1/2 sunflower seeds, sometimes i use 1/2 almonds and 1/2 peanuts or cashews or walnuts or pecans...it really depends on the end flavor you are going for and the dried fruit with which you will be mixing. grind the nuts until they are a fine powder. this step will start out very noisy, but will quiet down as the nuts are processed. pour the nuts into a bowl.


the next thing to do is the dates and dried fruit. make sure your dates are pitted or you will spend a long time cutting open dates and removing the pits. it will be the pits. (ba-dump-bum, chhh!) know that even if you buy pitted dates there is the occasional pit. your blade will find it and your food processor will let you know when this happens (it will stop spinning and make an awful noise). just stop the machine, remove the lid (unplug if you don't have a safety stop, i.e. mine won't run with the lid off), and carefully move back the dates to expose the blade and stuck pit. it will always be the top blade (i.e. the one that doesn't run along the bottom of the bowl) and will always be near the edge of the bowl. press the pit away from the blade and you can continue processing. you are going for a very fine, nearly pureed consistency.

once the fruit is ground, add the nuts back to the food processor and let everything mix together. if you find after a few minutes that the mixture is not holding together, you can add a little vanilla, water, or juice...a teaspoon or less at a time is more than enough.


at this point i like to use my largest cookie scoop (1/4 C - 1/3 C size) and snack size resealable baggies. put a scoop in the bag, zip closed most of the way, push out the air, and continue to close. mash into a bar shape and you're good to go. alternatively you can press the whole mixture into a pan, cut, and then wrap the bars in plastic. these are also very good made with a smaller cookie scoop into "energy balls" and stored in a container with plastic or waxed paper between the layers.


these do best stored in the refrigerator...the coolness helps to solidify the bars, making them easier to eat. i buy 3-5 pounds of pitted dates from the bulk bin and make as many bars as i can, determining the order i make them in so i can do the whole process from start to finish without having to wash my food processor. ;)

our favorites include:

dates, almonds, apricots
dates, almonds and peanuts, raisins...and a little cocoa powder (have to add vanilla for this one)
dates, pistachios, and dried cranberries
dates, almonds and sunflower seeds, orange dried cranberries
dates, almonds and walnuts, mixed berries
dates, almonds, wild blueberries and raisins

the combinations are endless. you can add chocolate chips to the mix if you want. that's very good, but we are typically eliminating extra sugar at every turn. ;)